Wallets
[et_pb_section bb_built=”1″ background_color=”#ffad2d” _builder_version=”3.2.2″ parallax=”on” background_image=”https://www.mybitcoin.com/wp-content/uploads/2018/05/orangebg.jpg” next_background_color=”#ffffff”][et_pb_row custom_padding=”0|0px|0|0px” _builder_version=”3.0.106″][et_pb_column type=”4_4″][et_pb_text _builder_version=”3.2.2″ custom_margin=”0px||0px|” custom_padding=”0px||0px|”]
Wallets
[/et_pb_text][/et_pb_column][/et_pb_row][/et_pb_section][et_pb_section bb_built=”1″ fullwidth=”off” specialty=”off” prev_background_color=”#ffad2d”][et_pb_row][et_pb_column type=”4_4″][et_pb_countdown_timer _builder_version=”3.2.2″ background_layout=”light” title=”Content Coming Soon” date_time=”2018-06-01 00:00″ background_color=”rgba(255,255,255,0.5)” /][/et_pb_column][/et_pb_row][/et_pb_section]
KeepKey Hardware Wallet For Bitcoin & Cryptocurrency Storage [REVIEW]
Simple Guide On How To Use The Keepkey Wallet
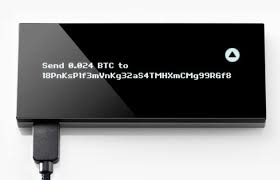
KeepKey is a cold wallet that secures your Bitcoin, Ethereum, Litecoin, Dogecoin, Dash, and Namecoin from thieves. The device stores your private keys securely, making sure it never leaves the device. As an additional feature, the device is PIN-protected, keeping the cryptographic asset of the owner secured even in the case of theft. The design of Keepkey ensures that each transaction must be manually approved using the confirmation button.
Keepkey has the following features.
- Multicurrency support
- Integration of ShapeShift to enable exchange service.
- Supported by clients including Electrum, MultiBit, and Mycelium
- Virus- and malware-proof
- Compatibility with majority of operating systems including: Windows, Mac, Linux, and Android.
Setting Up The KeepKey Hardware Wallet
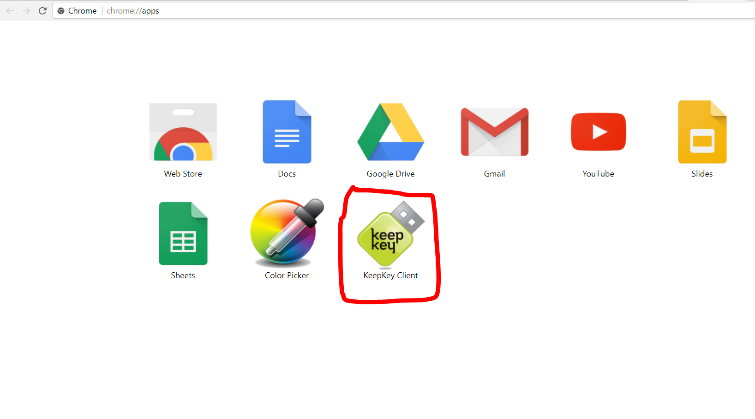
- Download and install the KeepKey Client App from the Chrome web store.
- Open Chrome and paste this address “chrome://apps” in to the address bar to locate the KeepKey Client App
- Connect Keepkey to your computer using the USB cable.
- Select a label for your KeepKey to help you distinguish your KeepKey in case you own multiple devices.
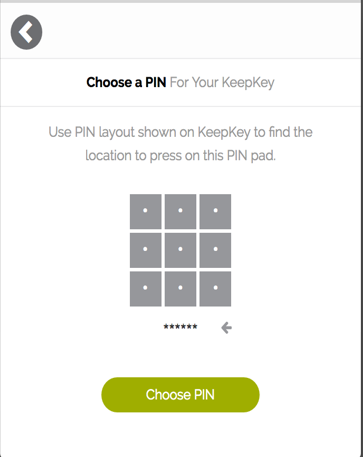
- Select a PIN between 1-9 digits by finding the position of the number you want to choose, by clicking on the corresponding location in the KeepKey Client Chrome App.
- Confirm your PIN.
- Write down the 12-word recovery sentence displayed on the device.
- Keep the recovery sentence in a safe and secure place. You will need it to recover your account and private keys if your KeepKey is lost or stolen.
Funding The Wallet
- Open the KeepKey Client App on Chrome browser.
- Plug in the device and authenticate it.
- Select the receiving account for the transaction from the list of accounts available.
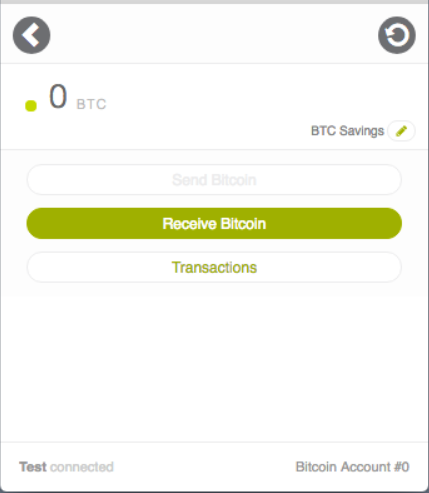
- Select “Receive Bitcoin” and copy the receiving address.
- Paste the address into the wallet from which you are willing to send your BTC.
KeepKey will provide you with an unused address to which you can send funds. This is one of the benefits of the device being a hierarchical deterministic(HD) wallet. Click on the green clipboard icon to copy the address to your clipboard. To generate more than one new address, click on the right arrow beside the QR code. This will create a new one.
- Verify the address shown on the device by making sure that the address provided matches the address displayed on your KeepKey. This step ensures that the address does in fact belong to KeepKey.
- Wait for the transaction to be confirmed on the blockchain.
Note: It is not compulsory for the device to be connected to your PC before receiving the BTC.
Transferring Funds From The Wallet
The process of sending BTC (or any other cryptocurrency as the case may be) can be easily completed following the steps below:
- Launch the KeepKey client app from your Chrome browser and enter your PIN
- Select “Send bitcoin”
- Enter the recipient’s wallet address
- Enter the amount you wish to send and click send.
- Verify the address and amount shown on the device.
- Make sure address shown on device matches the address entered into the app, by verifying both addresses.
- Confirm and click the send button.
- Wait for the transaction to be completed on the blockchain.
Ledger Hardware Wallet For Bitcoin & Cryptocurrency Storage [REVIEW]
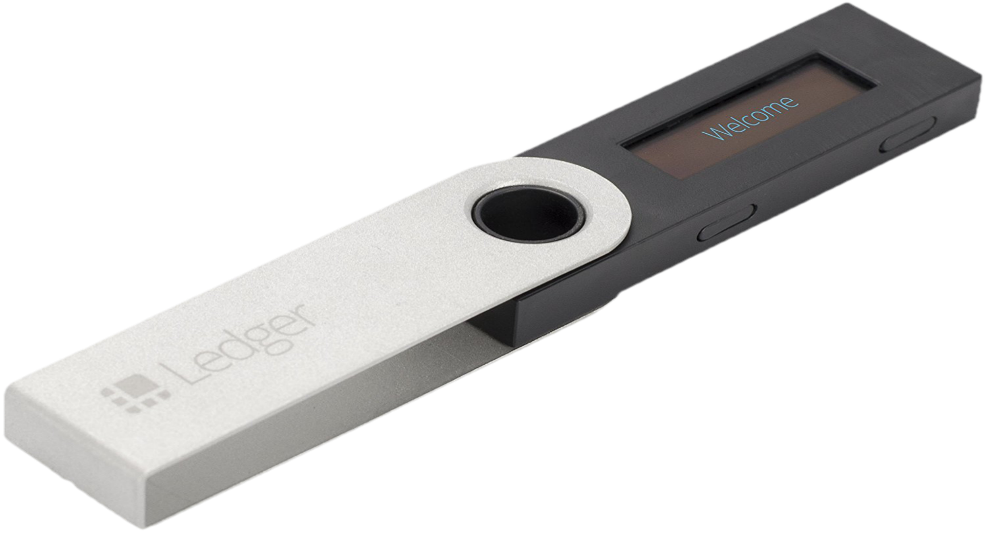
The Ledger Nano S is a hardware wallet, based on robust safety features for storing cryptographic assets and securing digital payments. It connects to any computer (USB) and embeds a secure OLED display to double-check and confirm each transaction with a single tap on its side buttons.
Unlike some other wallets, the Ledger Nano Scan be used to store varieties of cryptographic assets including:
Ethereum, Ethereum classic, Dash, Ripple, Stratis, ZCash, Litecoin, NEO, Bitcoin Gold, Bitcoin Cash, Viacoin, PoSW, ARK, Ubiq, Expanse, PIVX, Stealthcoin, NEO and ERC20 tokens.
Like most other hardware wallet, Ledger is compatible with all major operating systems including Windows, Mac, Linux, and Chrome OS, and Android.
To ensure maximum security while making transaction with the device, the seed word is only displayed to the user on the physical device, and the user needs to confirm or cancel any transaction by tapping the buttons of the device. So, even if your computer is hacked, the hacker won’t be able to transfer those cryptographic assets because they don’t have physical access to your Ledger Nano S.
Also, the Ledger Nano S is an Hierarchical Definition HD wallet, meaning you get a new receiving address each time you want to receive funds. Additionally, you can also sign a message using the Ledger Nano S to prove your ownership of the address.
Setting Up Ledger Nano S
Set the Pin Code
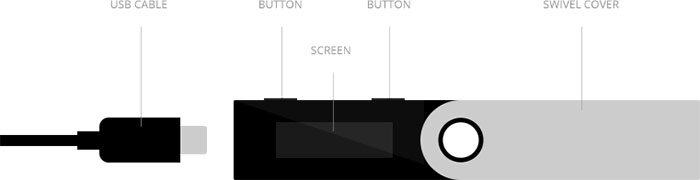
As you would see, the device has no power button. To put on the device, you simply need to plug your Nano S with the USB cable on a computer, and disconnect the cable to turn it off.
Follow the instructions on the embedded small screen to set the pin code. Press both buttons on the device and choose either of the two options displayed on the screen:
- To configure a new device, with an original seed or
- Restore a configuration
If you want to create a new seed, select “Configure as new device” by clicking on the right button (above the check icon), else, if you want to import a seed you already have, click on the left button (above the cross), you will be prompted to restore a configuration. The next step is to choose a PIN code.
Note: You can choose to create a new wallet, or import a Bitcoin account or an Ethereum account. Whatever your selection, you just need to observe the on-screen instructions all along the process, selecting and validating with the two buttons above the display.
Backup the Recovery Phrase
Copy the sequence of numbers that appear in their order of appearance. This step is really important to guarantee you can recover anytime your wallet in case of loss or theft.
This step is important as this seed is the only proof of ownership and the backup of your wallet and funds. You must be careful to read and write each word correctly. If you make even one single mistake on a character, your seed would be false and you would not be able to recover your funds in case of need. It is highly recommended that you make use of the Recovery sheet provided in your box.
Once the full list of 24 words have been written down, you’ll be need to make verification of the copied seed phrase by comparing each word in the copied phrase with the displayed words by selecting the right ones that match with the ones you copied. You won’t be able to finish the configuration without confirming you copied the 24 words by selecting some of them as requested.
Install the Ledger Apps
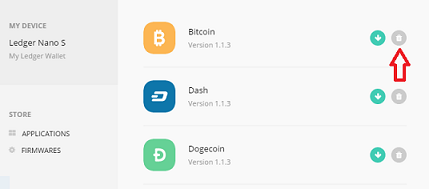
Once your Nano S displays “Your device is now ready”, your Nano S is configured. Now you just have to install the Ledger Apps on your computer to use your wallet. Since the Nano S is a supports a variety of currencies, you can install several applications on it.
By default, your Nano S Bitcoin, Ethereum, and FIDO U2F applications already installed. Using the Ledger manager, you can add new applications not more than an overall of five (5) applications at a time to the device, and they can be removed or replaced at your convenience. Removing an application won't make you lose your coins, as you will be able to see your balance and transact as soon as the coin application has been installed again.
To install The Ledger Manager On your computer:
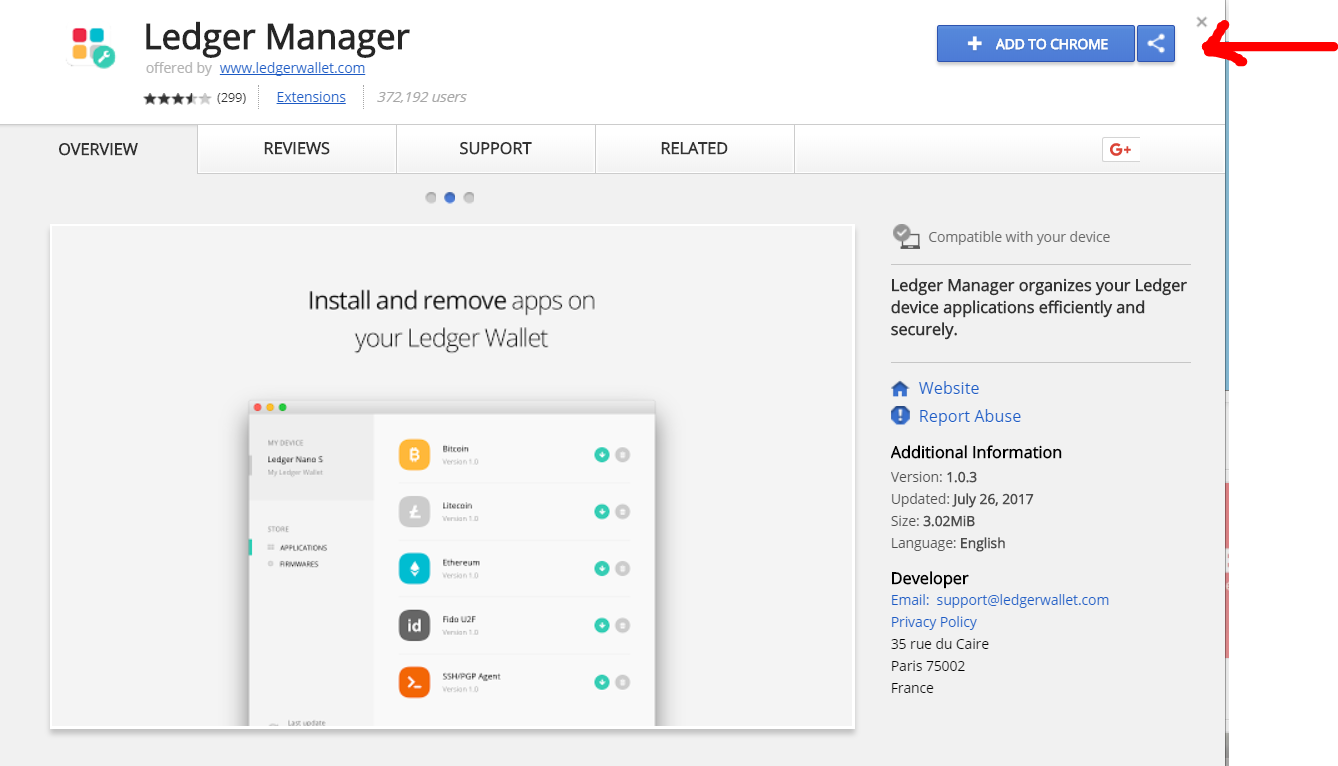
In your Chrome browser, go to the Chrome webstore and click on “Add to Chrome”
Launch the Ledger Manager after adding to Chrome.
In your Chrome browser, go to More tools > Extensions, scroll until you find the application and launch it
The Ledger Manager is a free app store, from where you can make updates, install and uninstall applications on the Nano S and the Blue. It doesn't manage your coins or launch your accounts applications.

After Launching the application, you’ll see the page as shown below:
Then connect your Nano S to the computer using the provided USB cable. Enter your PIN, and stay on the dashboard. For each action made with the Ledger Manager, a confirmation will be required on your device as a signature.
- To install an application on your device, click on the green bottom arrow icon, and confirm the installation when required on your device.
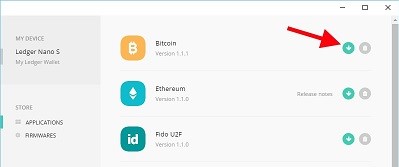
- To uninstall an application on your device, click on the bin icon.
Now you can use your Nano S with your Chrome apps on any computer, even a compromised one, to send or receive payments. Each transaction will be verified on the embedded display, and validated with buttons.
SENDING/RECEIVING BTC WITH THE YOUR LEDGER NANO S
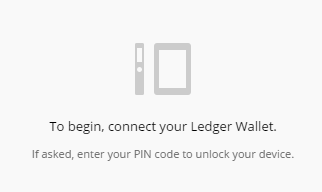
To Receive BTC with Your Nano S Device
Once your device is initialized, launch the Ledger Wallet Bitcoin Chrome application.
- Connect your Ledger device
- Enter your PIN code
- Open the Bitcoin application on your device
- Launch your Bitcoin Chrome application on your computer
- Click on “Receive”, a popup window opens
- Copy the “Bitcoin address” which is displayed, paste the address into the receiving wallet, and wait for confirmation.
To Receive BTC with Your Nano S Device
Once your device is initialized, launch the Ledger Wallet Bitcoin Chrome application.
- Connect your Ledger device
- Enter your PIN code
- Open the Bitcoin app on your Nano S (right click)
- Launch your Bitcoin Chrome application on your computer
- Click on “Send“, a popup window opens
- Fill in the required fields: amount, recipient address (you can paste or scan),
- Click on the “Send” button
- Authenticate the physical device
Press the right button (above the “V” check icon) to confirm once you have verified the details of your transaction are right and wait until your Chrome app displays “validated“.
Your transaction is validated and will be tracked on the Blockchain as soon as it is confirmed by miners in accordance with Bitcoin protocol.
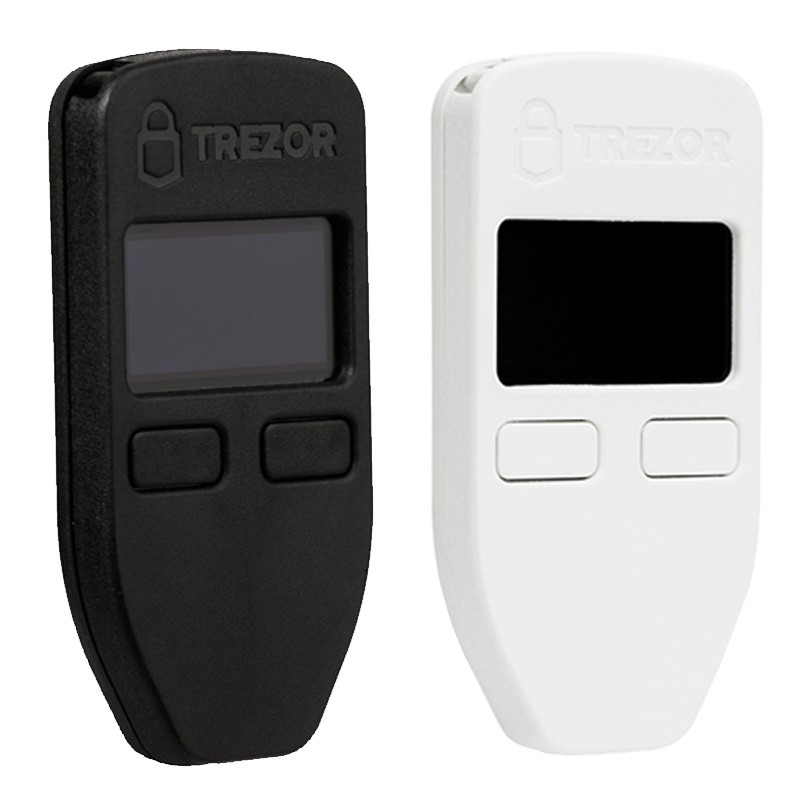
Trezor Hardware Wallet For Bitcoin & Cryptocurrency Storage [REVIEW]
TREZOR is a hardware wallet that provides advanced security for handling private keys. Unlike traditional offline wallets, TREZOR is able to make secure transactions without exposing user’s private keys to potentially compromised computers.
The entire wallet can be backed up with the twenty-four randomly generated words, using RNG from the device and the computer on setup. The process ensures that the seed is generated offline, making sure the seed is never on an internet connected device.
As an additional security measure, setting up the wallet requires you to set a pin. The pin is a sequence of numbers randomly arranged on the devices screen. The random arrangement of the numbers is to create a difficulty in guessing the code in the case of theft.
The difficulty of guessing is increased to the power of 2 after every incorrect guess, therefore increasing the time to make 30 correct guesses to at least 17 years. You can also add a passphrase to the 24-word seed for extra security, to act as a 25th word, which must always be remembered at each login attempt. The passphrase offers more security, but if forgotten the wallet cannot be recovered. As an added advantage, Trezor uses BIP39 and BIP44 standards for creating new wallets, so the generated 24-word seed and passphrase can be used by other compatible wallets to recover the wallet in case of theft or damage of the device.
Also, to restrict a hacker’s access to zero, each transaction must be confirmed on the device’s screen by pressing the button so as to make sure the hacker couldn’t automatically send a transaction from the device.
Trezor is compatible with varieties of wallets, including:
- Electrum
- MultiBit HD
- GreenAddress
- ArcBit
- Blockonomics
- Copay
- Electrum
- Etherwall
- Mycelium
- TREZOR Web Wallet, and
- Sentinel
Trezor Setup & Initialization
The three basic ways to setup the Trezor hardware wallet include:
- myTREZOR
- Chrome extension
Setting up Trezor Using myTrezor.com
- Go to myTrezor wallet website.
- Select your preferred operating system and Click on the download button to download the setup.
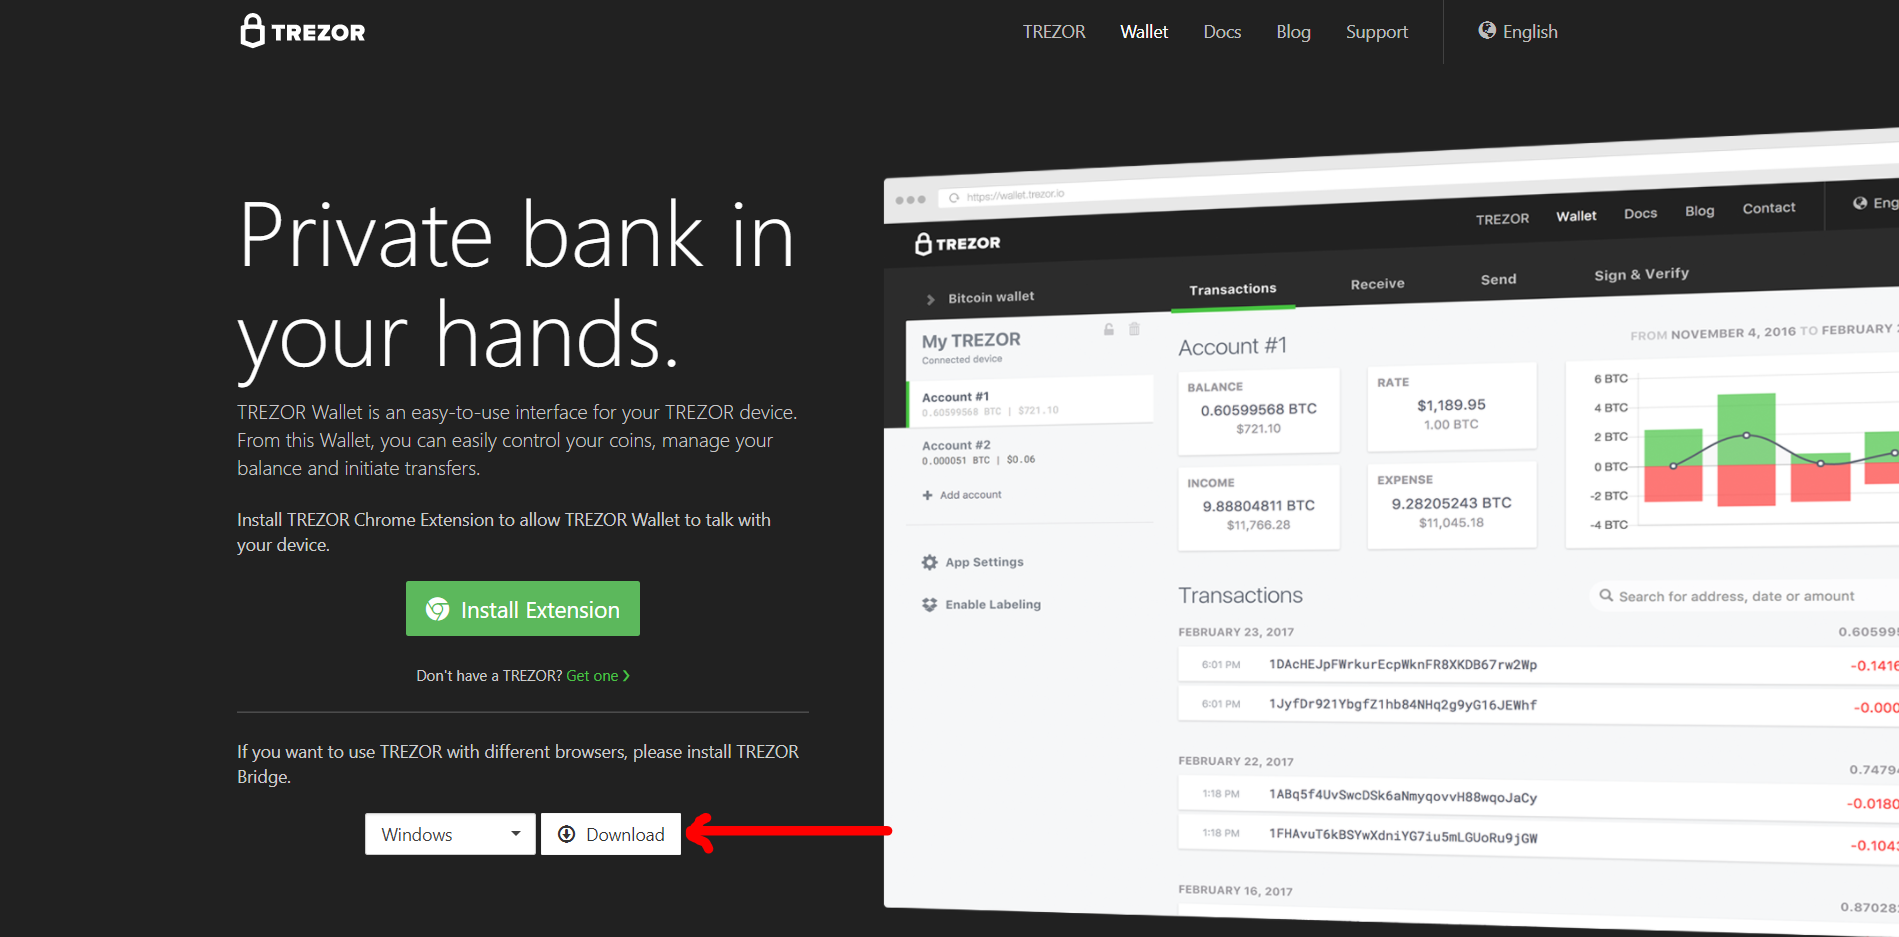
- Launch the downloaded file to proceed with the setup.
- Start the program after installation and follow the instructions to complete the setup
- To make sure you always have the newest version of firmware when setting up the device, the first thing you will be asked to do is to install the device system – firmware. Simply confirm it on the device, and verify the fingerprint after the process is done.
- After installing firmware, replug your TREZOR, and you should see a web page welcoming you and asking for a device label
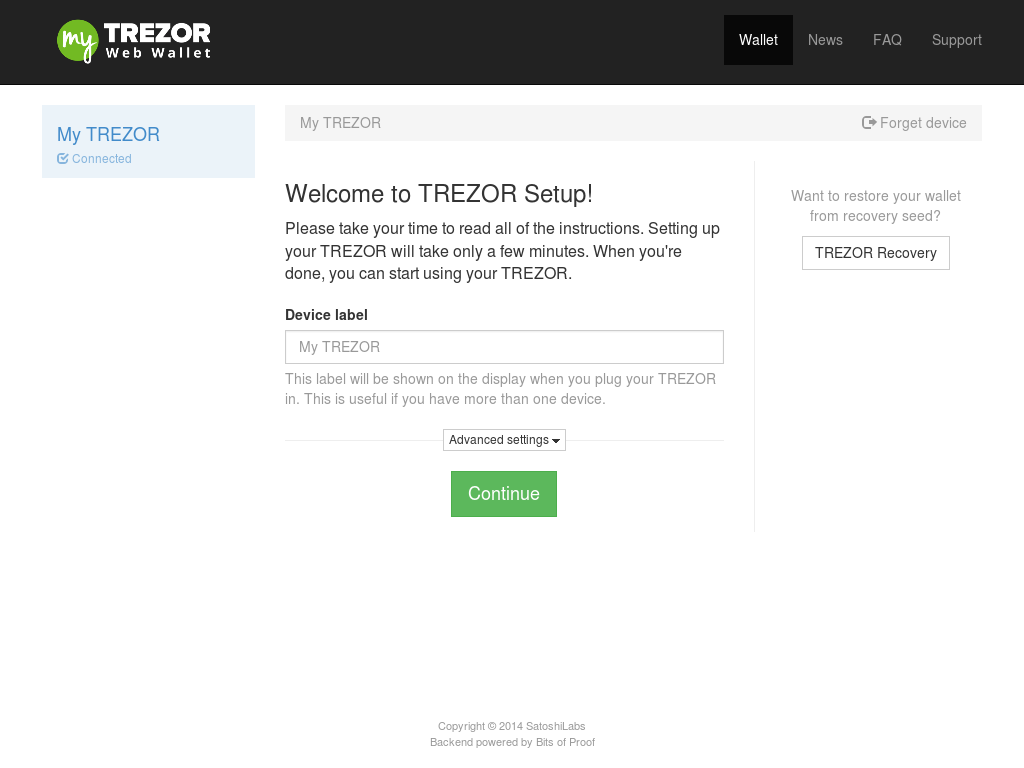
- Enter a new name for your TREZOR device and press Continue.
- If you have set your device label successfully you will now see a message on your TREZOR’s screen prompting you to write down the seed.
- Now you should get out the recovery card that came with your TREZOR and fill out the blanks with the words you see on your Trezor screen.
- To go to the next word, press the right button on the device while writing each word on the card.
- Once you have written down the secret words in your seed you will find yourself at the beginning of the list again. As you proceed through the list of seed words for the second time, check them against your recovery card to ensure that you have filled out your recovery card correctly, and you are ready to use start using your TREZOR device!
Setting up Trezor using Chrome browser extension
The Google Chrome is a free Internet browser available for free on almost all the major operating systems. Chrome extensions allow you to add cross-platform functionalities to Chrome and chrome-based browsers without diving deeply into native code. TREZOR wallet can also be setup using the Chrome extension to allow cross platform functionalities. The following steps should be followed when setting the device:
- Go to webstore to download and install the browser extension.
- Connect the device to your computer using the USB cable.
- Once the plugin is activated, myTrezor will prompt you to choose a PIN.
- Write down the randomly generated sequence of 24 words as described above.
Setting up the Chrome extension on Linux
Linux users, after you install the Chrome extension in TREZOR Wallet on Linux, you will be asked to install additional package (DEB or RPM), which configures UDEV rules of your system, necessary for communication between the device and Chrome browser. Then, continue with the following steps.
It should be noted that:
myTREZOR.com is TREZOR’s web wallet, while the Chrome extension is an app installed to your browser. The setup process on both is the same. The one difference is that setup in myTREZOR.com is online, while the Chrome extension can be used offline. It is generally recommended to use the Chrome extension and setup offline if you care about your privacy.
Setting up Trezor using the Trezor manager for Android
Provided your phone supports the USB Host (USB On The Go – OTG):
- Download the Trezor manager for Android here.
- Connect the Trezor hardware with the phone using the OTG
- Follow the instructions on the screen as described above to complete the process
DEPOSITING/WITHDRAWING BTC TO YOUR TREZOR
Depositing BTC to your Trezor wallet
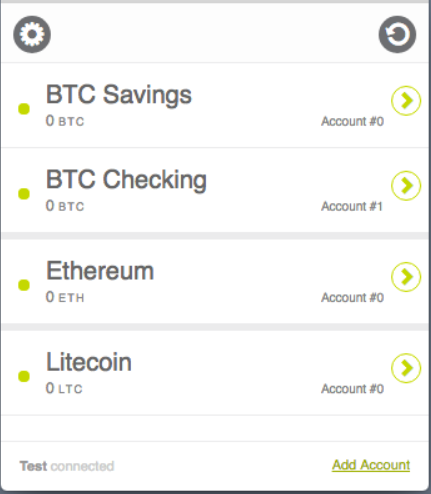
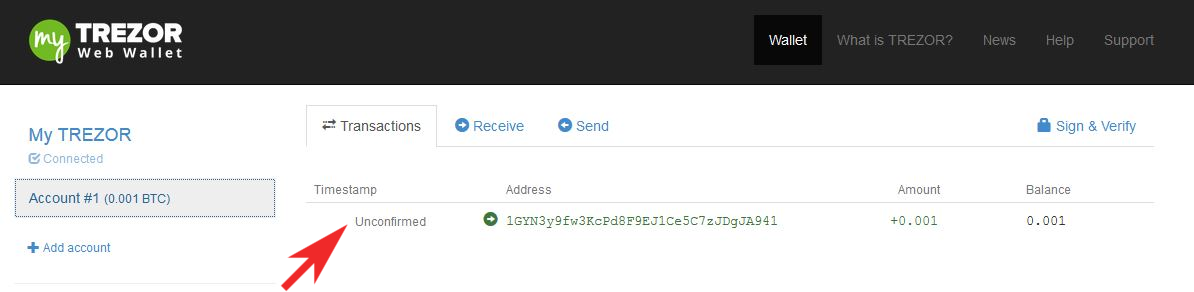
- In myTrezor, click on “Account #1” on the left of the screen and you will see an empty Transactions tab.
- Select the “Receive” tab to get your first bitcoin address
Note: When someone makes a payment to you, you will see the green (incoming) transaction appear in the transactions pane.
Depositing BTC with your Trezor wallet
- Go to the account page in myTrezor and press send. You'll be taken to a payment page like this:
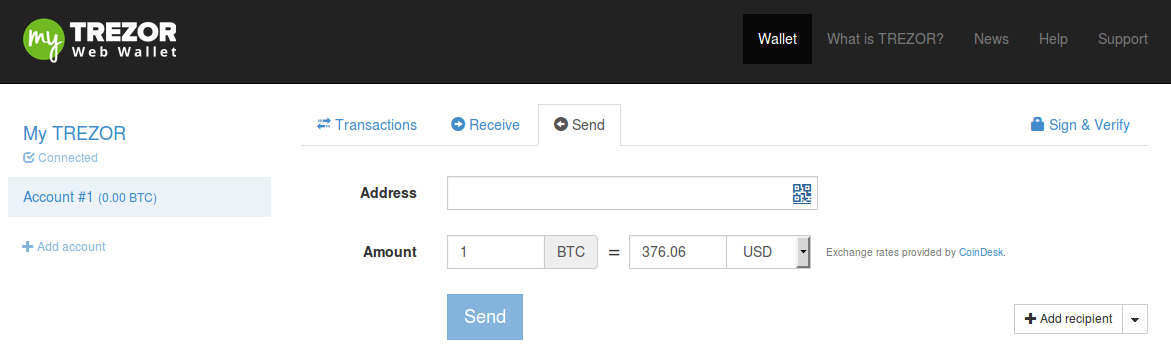
- Enter the destination bitcoin address.
- Press send and enter your PIN
- Confirm the transaction on your Trezor
Note:
You can send bitcoins to multiple addresses with one transaction by pressing the ‘+’ button in the right-hand corner of the Send page. You can also choose to add multiple transactions by clicking on the “Import from CSV” button.

Bitcoin Price Starting to Recover After Sharp Drop; Top Alts Ethereum and Litecoin Are Struggling

Bitcoin (BTC), Ethereum (ETH), and Litecoin (LTC) Price Prediction for Today’s Top Cryptocurrencies

Ripple Price Analysis: XRP/USD Primed For Further Gains

Bitcoin Price Analysis: BTC Surging, Next Stop Could Be $9,750

Ethereum Price Analysis: ETH Approaching Significant Support Area

Bitcoin Price Analysis: BTC Setting Up For Another Bull Run

Crypto Media Site CCN Announces It’s Shutting Down After Latest Google Update

Bitcoin (BTC), Ethereum (ETH), Litecoin (LTC) and Bitcoin Cash (BCH) Price Analysis June 10th

Facebook and the CFTC Discuss The Future of the GlobalCoin
